
SPD-SX Editor
A kit and pad editor, a sample librarian and a sound-design workshop in one Mac app for the Roland SPD-SX and SPD-SX SE. You work on a copy of your SD card or a backup, play the kit from the hardware while you edit, and save only when you are happy.
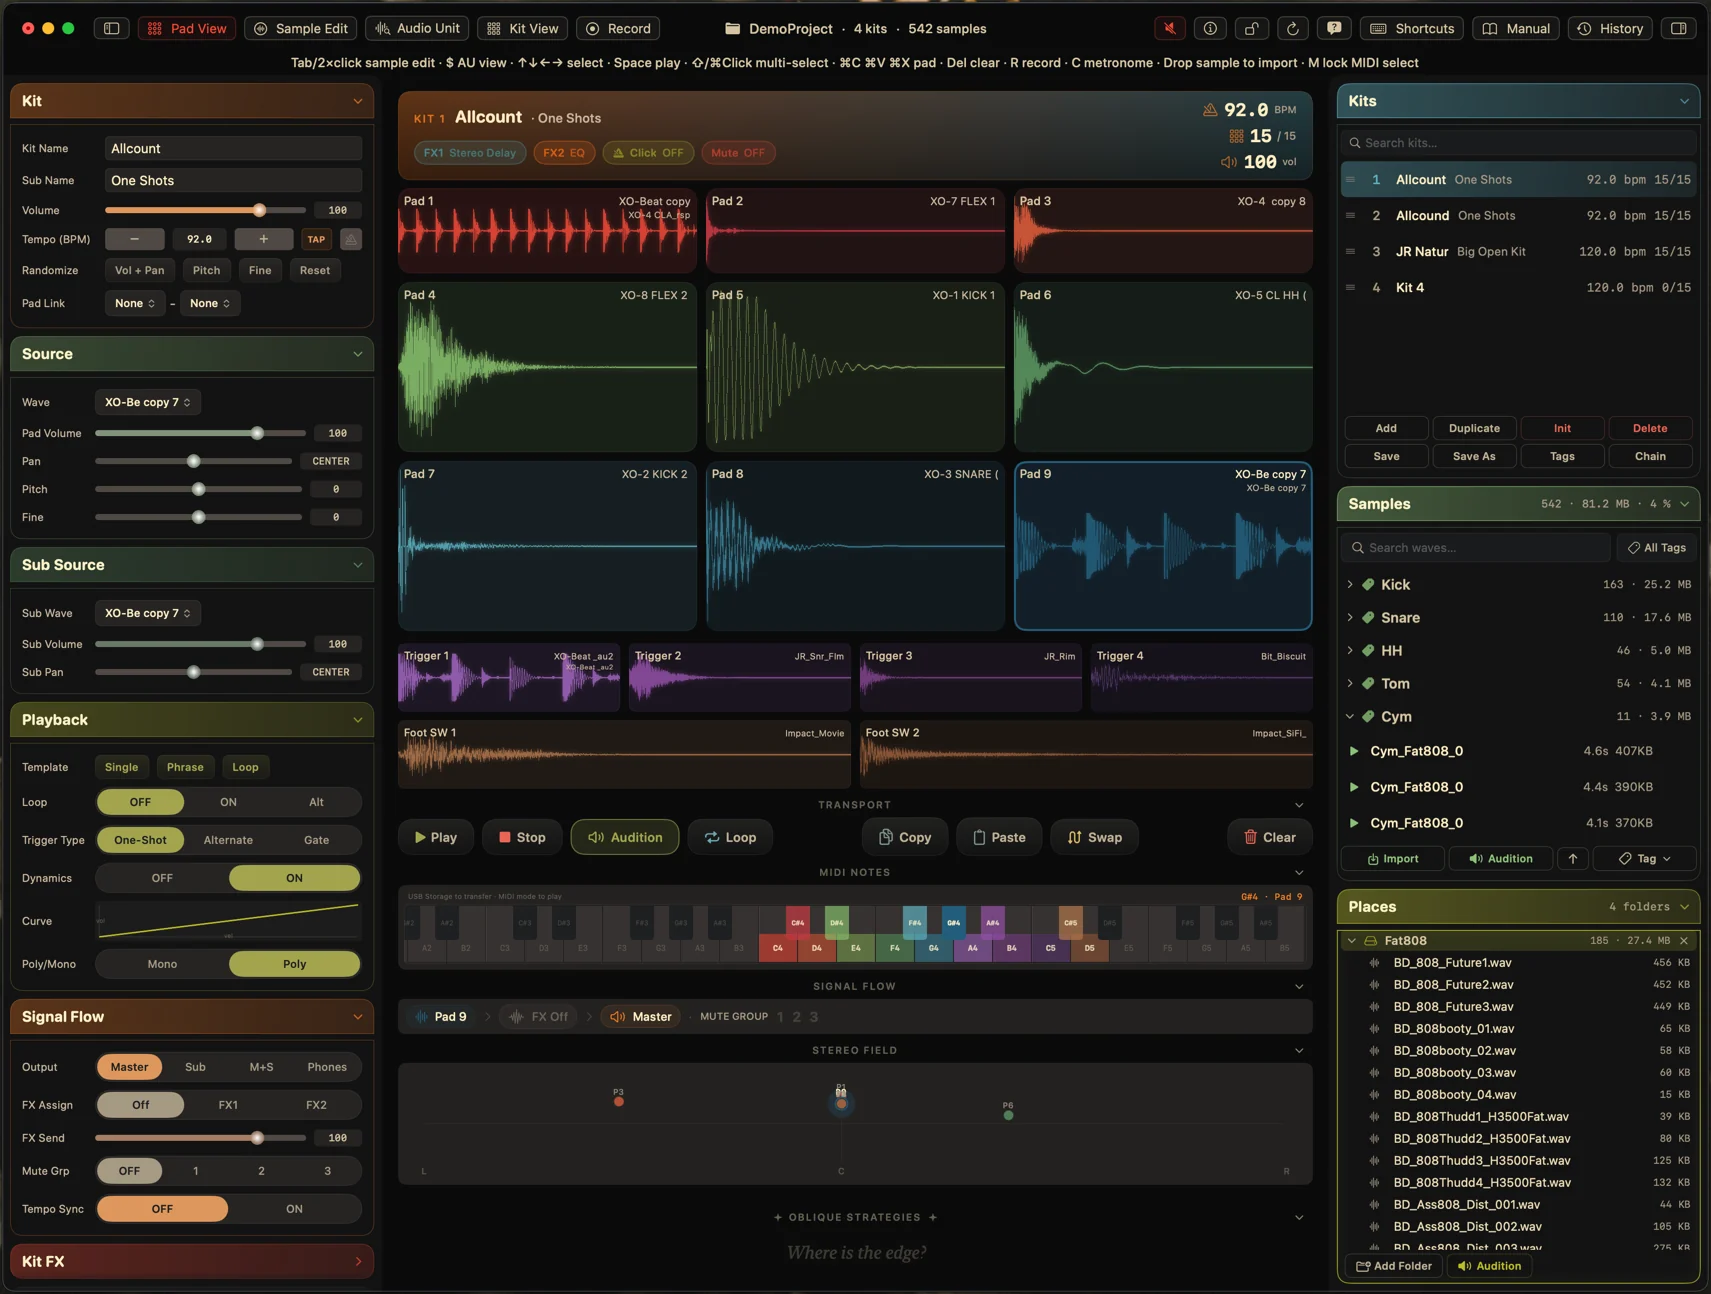
Trim, fade and normalize without leaving the app
Open a sample on any pad and set its start and end points on the waveform. Volume, pan, pitch, fade and normalize sit on the same screen, so a sample goes from imported to finished without a round trip through another editor.
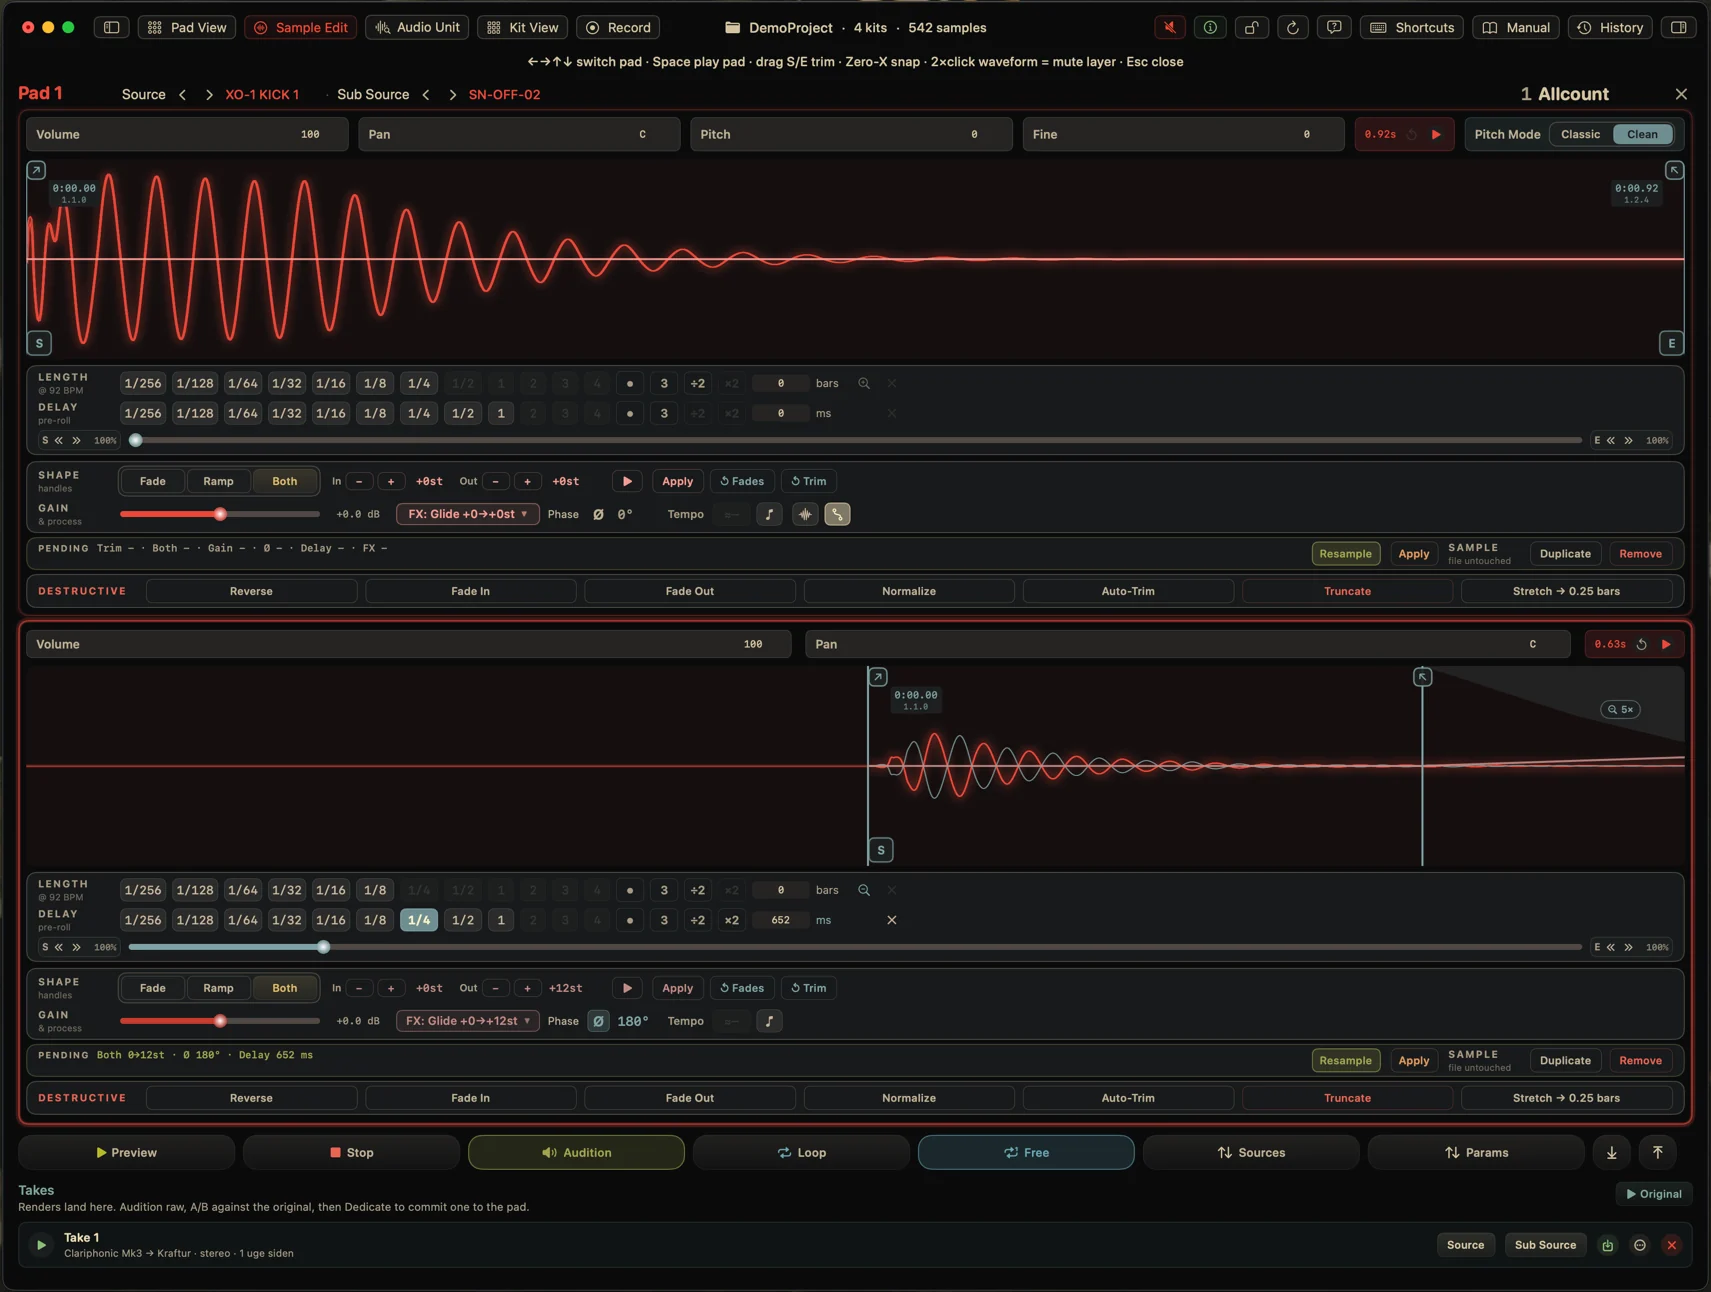
A pad can hold two layers, and the editor shows them stacked rather than one at a time: the source on top, the sub source under it, each with its own waveform, its own start and end handles and its own fade curve. Editing a layered pad is therefore one screen and one comparison, not two round trips through a picker.
Under each waveform are the values a drummer actually reaches for. Note lengths and pre-delay are laid out as grids of musical divisions rather than typed in milliseconds, so a pre-delay is chosen as a sixteenth and not as a number you have to work out. Fade and ramp share one control pair with a shape handle each, and gain sits beside them.
The two rows at the bottom are deliberately not the same kind of thing. One is a pending row: it lists the trim, gain, delay and effect changes you have made but not yet committed, so you can hear them and undo them. The other is marked destructive, and holds the operations that rewrite the file: Reverse, Fade In, Fade Out, Normalize, Auto-Trim, Truncate and Stretch. Knowing which of the two rows you are pressing is most of what makes an editor safe to work fast in.
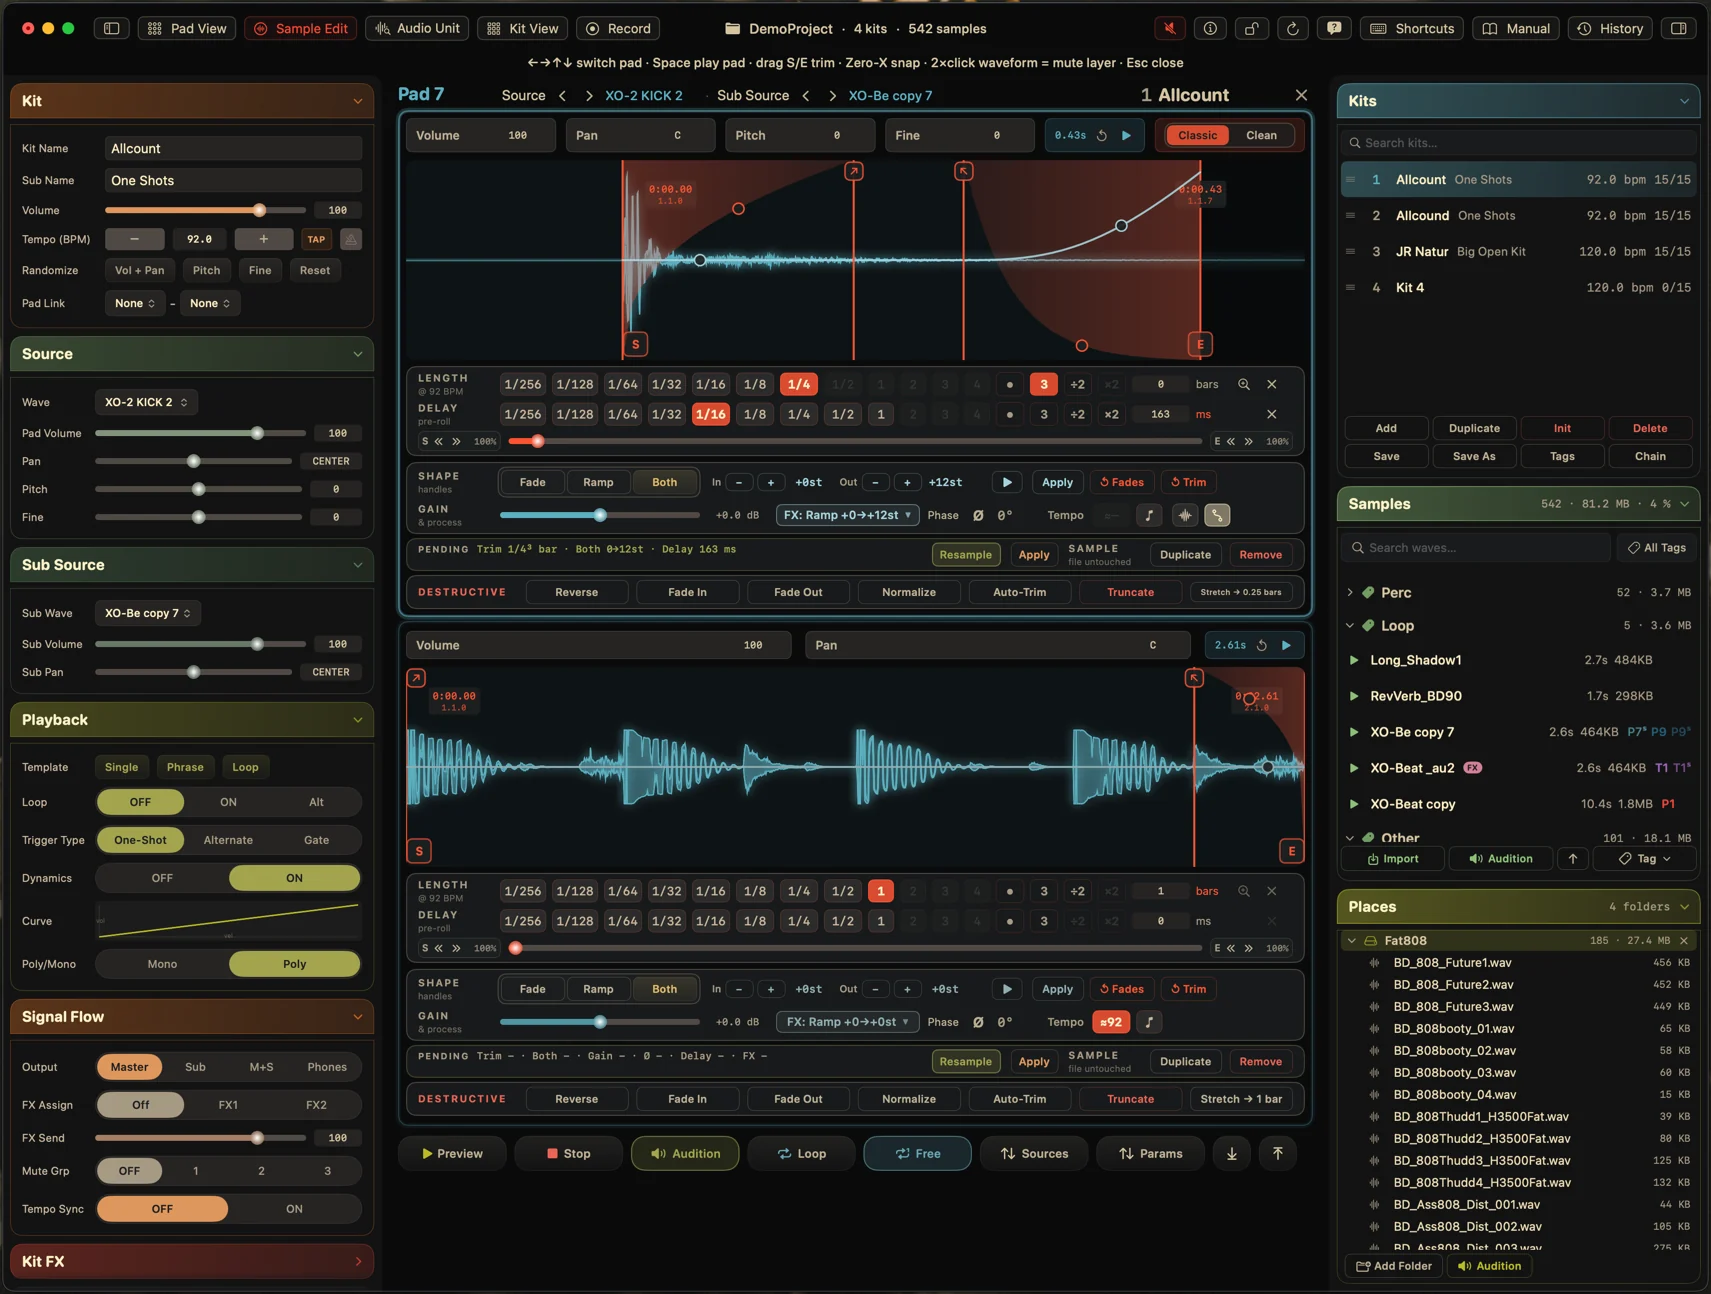
Eleven processors, each described where you use it
Drive, wavefold, bitcrush, rectify, ring modulation, transient shaping, density, tape, clip, stutter and noise blend open in one panel over the sample you are working on. Each one carries its own description next to its own controls, and its own preview and apply buttons, so a setting can be heard on the actual sample before it is applied.
The panel opens OVER the sample editor rather than replacing it, and that is the whole design. The tab you were in stays lit, the waveform you were working on stays where it was, and the processor lands on that sample and no other. There is no send, no bus and no chain to reason about: the thing you can see is the thing being processed.
Every processor states in a line of text what it does, next to the sliders that do it. That sounds like a small thing and is the difference between eleven processors you use and eleven you scroll past. Rectify and density are not words with one agreed meaning across audio software, so the panel says which meaning it holds instead of assuming you already know.
Preview and apply are separate buttons on every one of them. Preview plays the setting on the real sample at its real level, so the decision is made by ear on the material rather than by reading a number. Nothing is written until apply, and this is a Mac app working on a copy of your card, so the worst outcome of an experiment is that you do not press the second button.
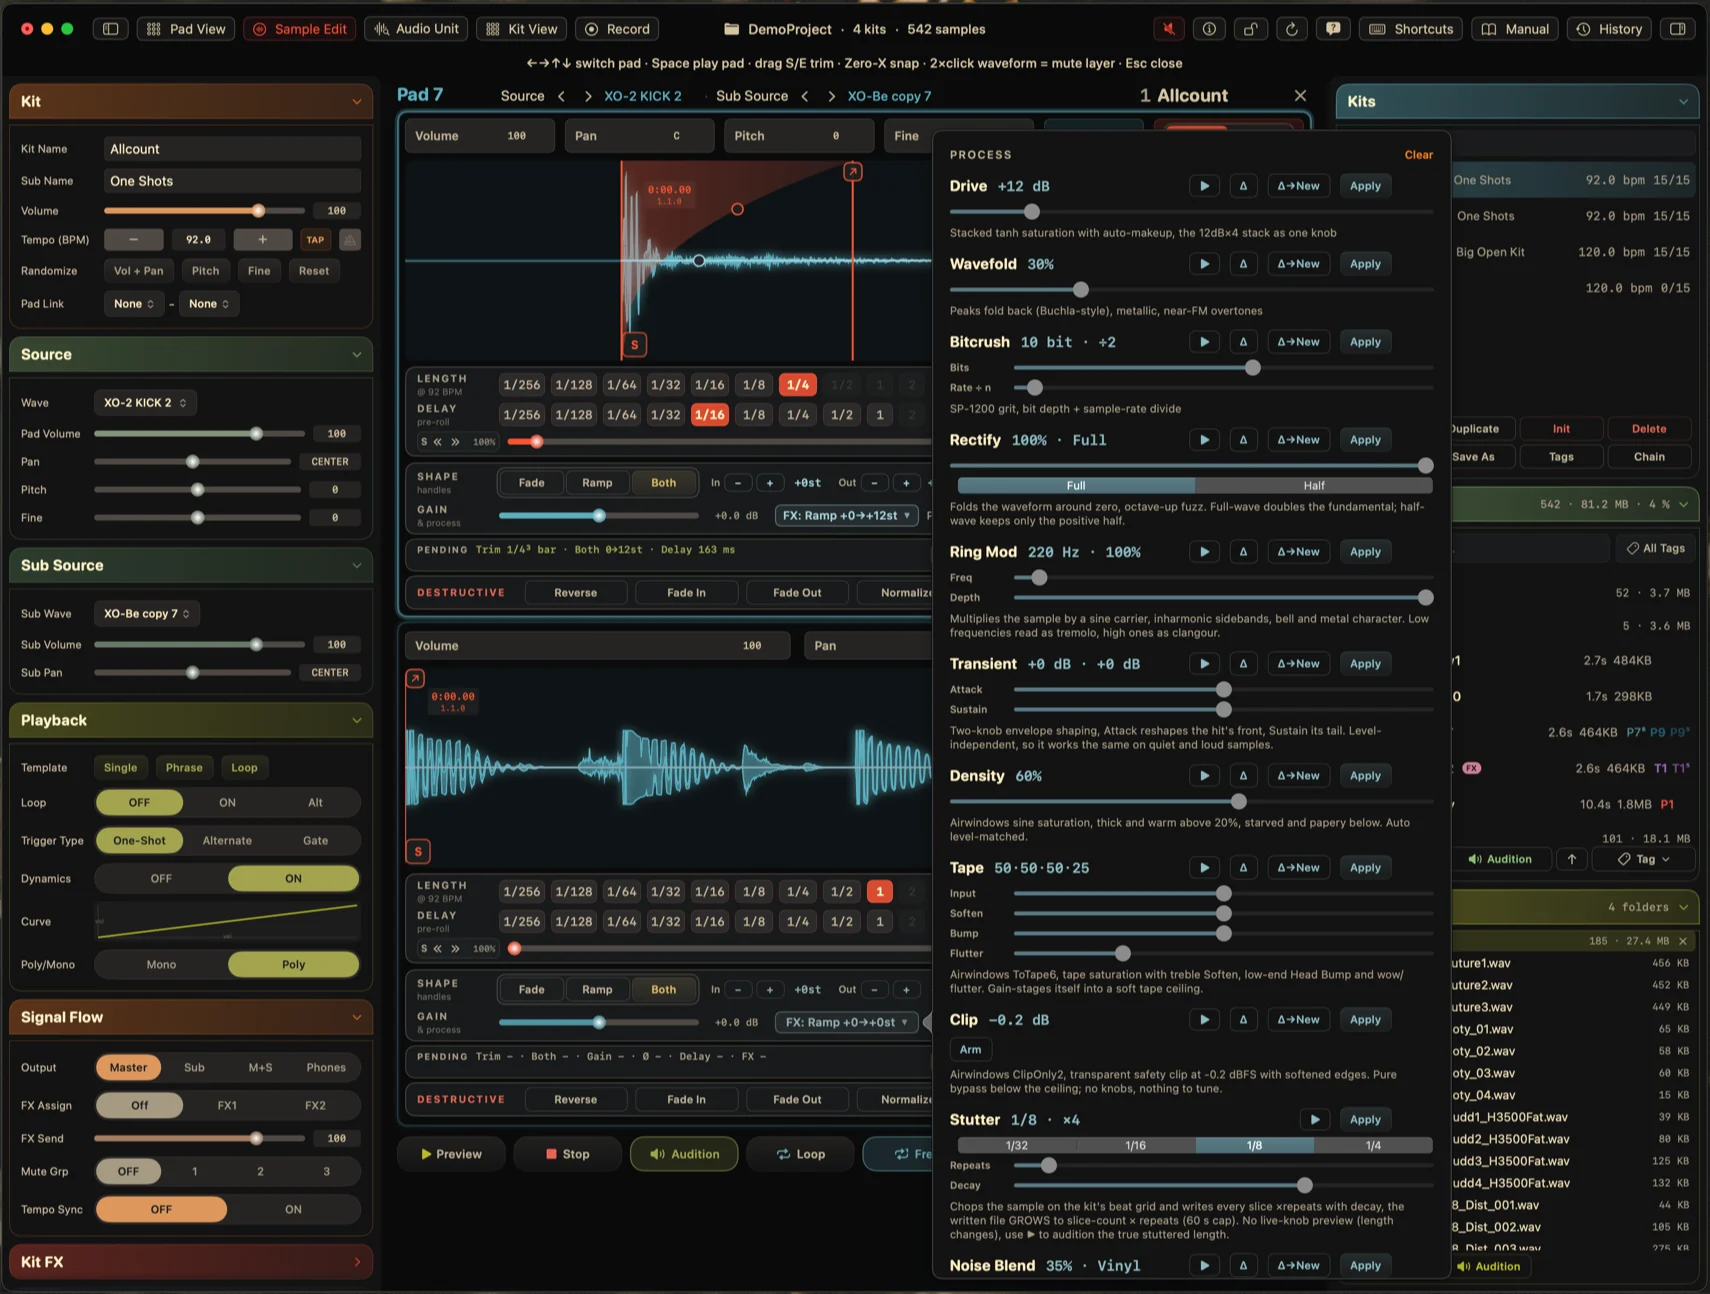
Record onto the pad you have selected
The record panel opens over the kit rather than in a window of its own. Choose the input, set its level against the meter, and read the sample rate and channel count stated under the Record button before the first take. The metronome counts the bar on four dots and shows the tempo and time signature it is counting, and the finished take lands on the selected pad.
Landing on the selected pad is the point. Recording into a separate app means a file, a folder, a name and an import before you find out whether the take was any good. Here the pad you had selected is the destination, so the loop from hitting record to hitting the pad and hearing it is short enough that you can afford to do it again.
The sample rate and channel count are printed rather than assumed, because a wrong interface is the most common way a session starts badly and the cheapest one to notice. The metronome shows what it is counting for the same reason: a count-in that agrees with the kit tempo is a count-in you can play to.
Auto-trim and the take review from the sample editor apply to what you just recorded exactly as they do to anything you imported. A recorded take is not a second class of sample in this app, it is a sample that arrived a different way.
See the whole project at once
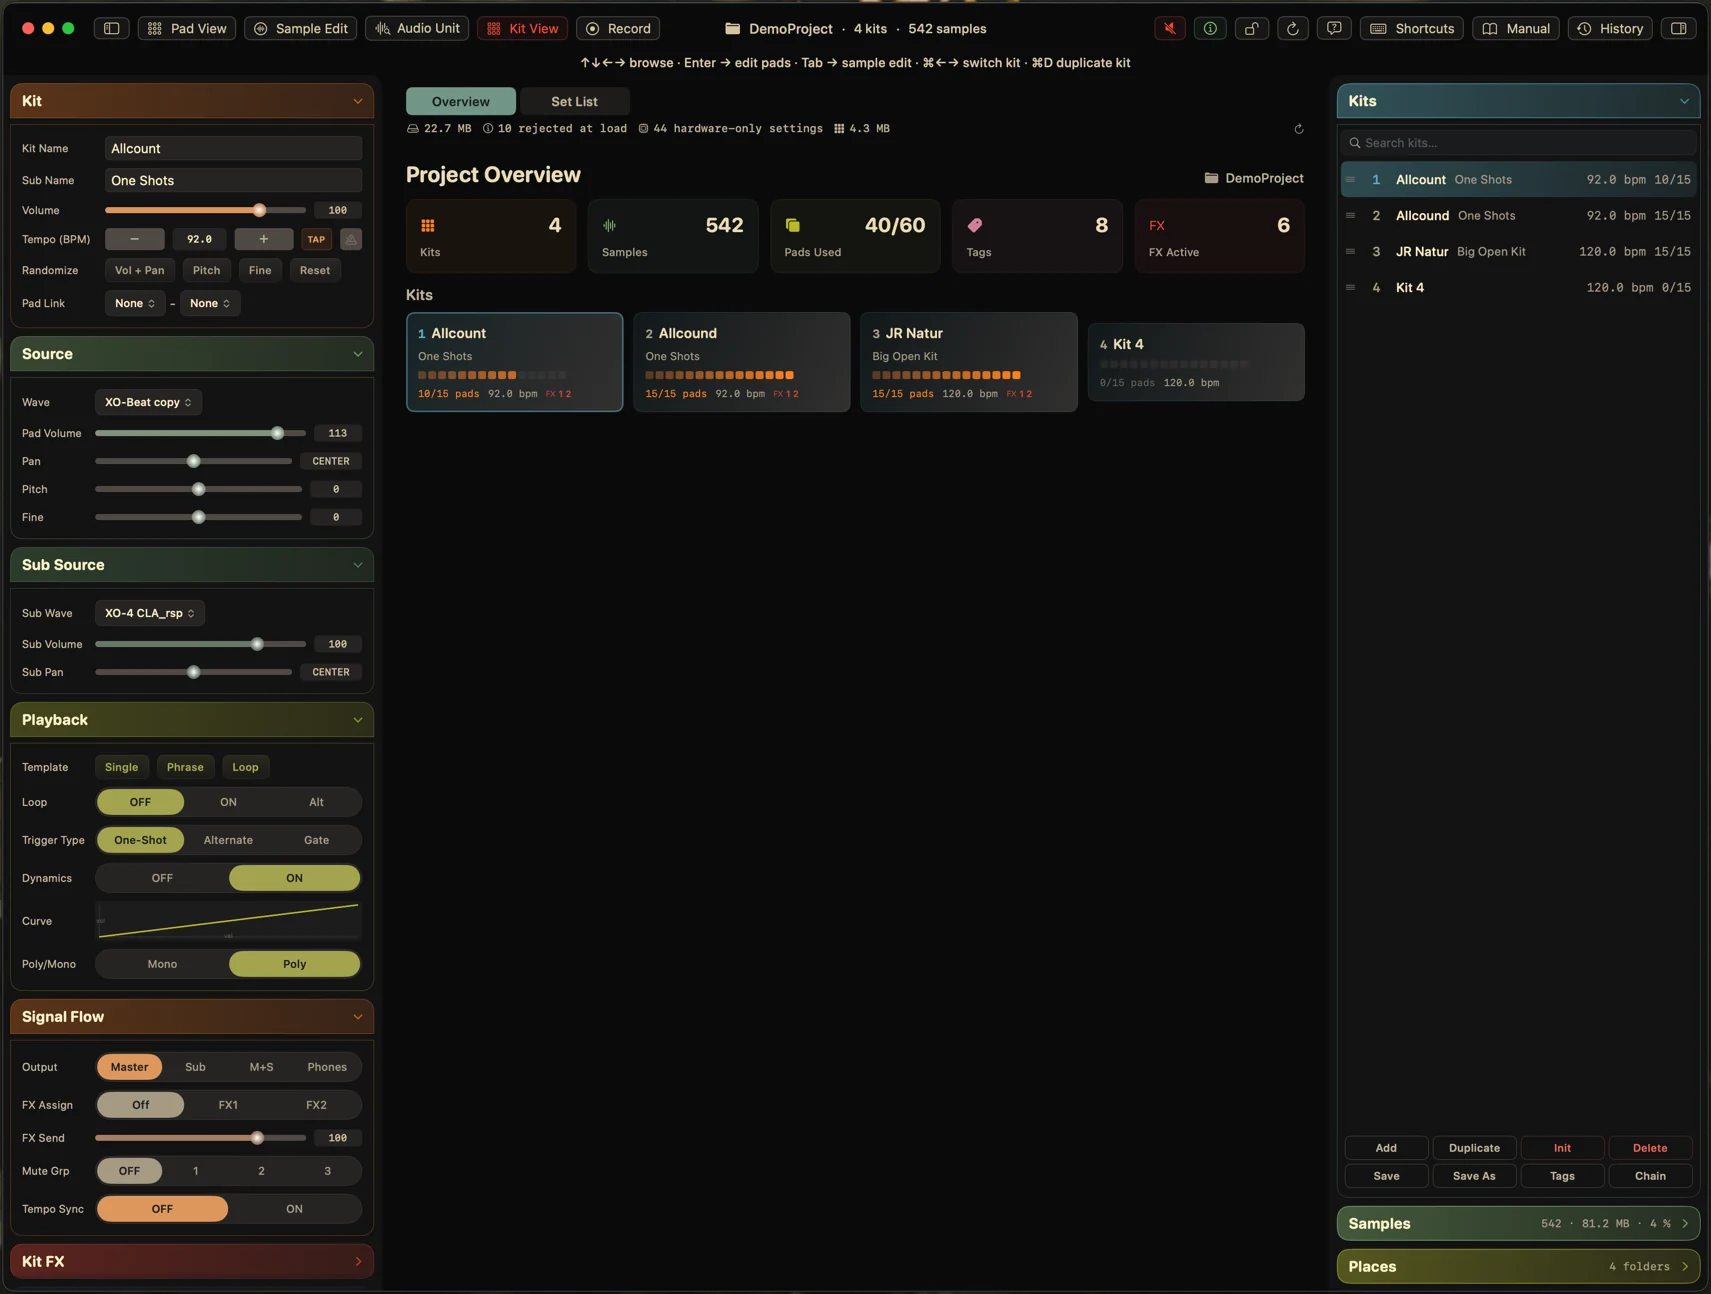
The overview opens on five numbers for the whole project: how many kits it holds, how many samples, how many pads of the total are actually in use, how many tags are in play, and how many effects are active. That is the state of a card in one line, before you have opened anything.
The pads-used counter is the one that tends to surprise people. It counts every pad across every kit, so a project can look busy in the kit list and still be two thirds empty, and you can see which it is without stepping through the kits on the hardware.
Under the counters, every kit gets a card: its number and name, its sub name, a row of small blocks showing how much of the pad grid is filled, its pad count and tempo, and a badge for each effect it has active. A kit with nothing on it is drawn dim and reads as empty at a glance, which is what makes this the view you use to decide where a new sound belongs.
It is also the view that answers the awkward questions about someone else’s card. Which kits are duplicates, which ones run at a different tempo from the rest, which ones are carrying the effects: all of that is on one screen, and none of it requires loading a kit to find out.
What a project is on the card itself, the folder layout, the fixed hundred kits, the two kinds of backup file, is written up separately: how the SPD-SX stores kits, waves and backups.
Put the kits in playing order and step through them
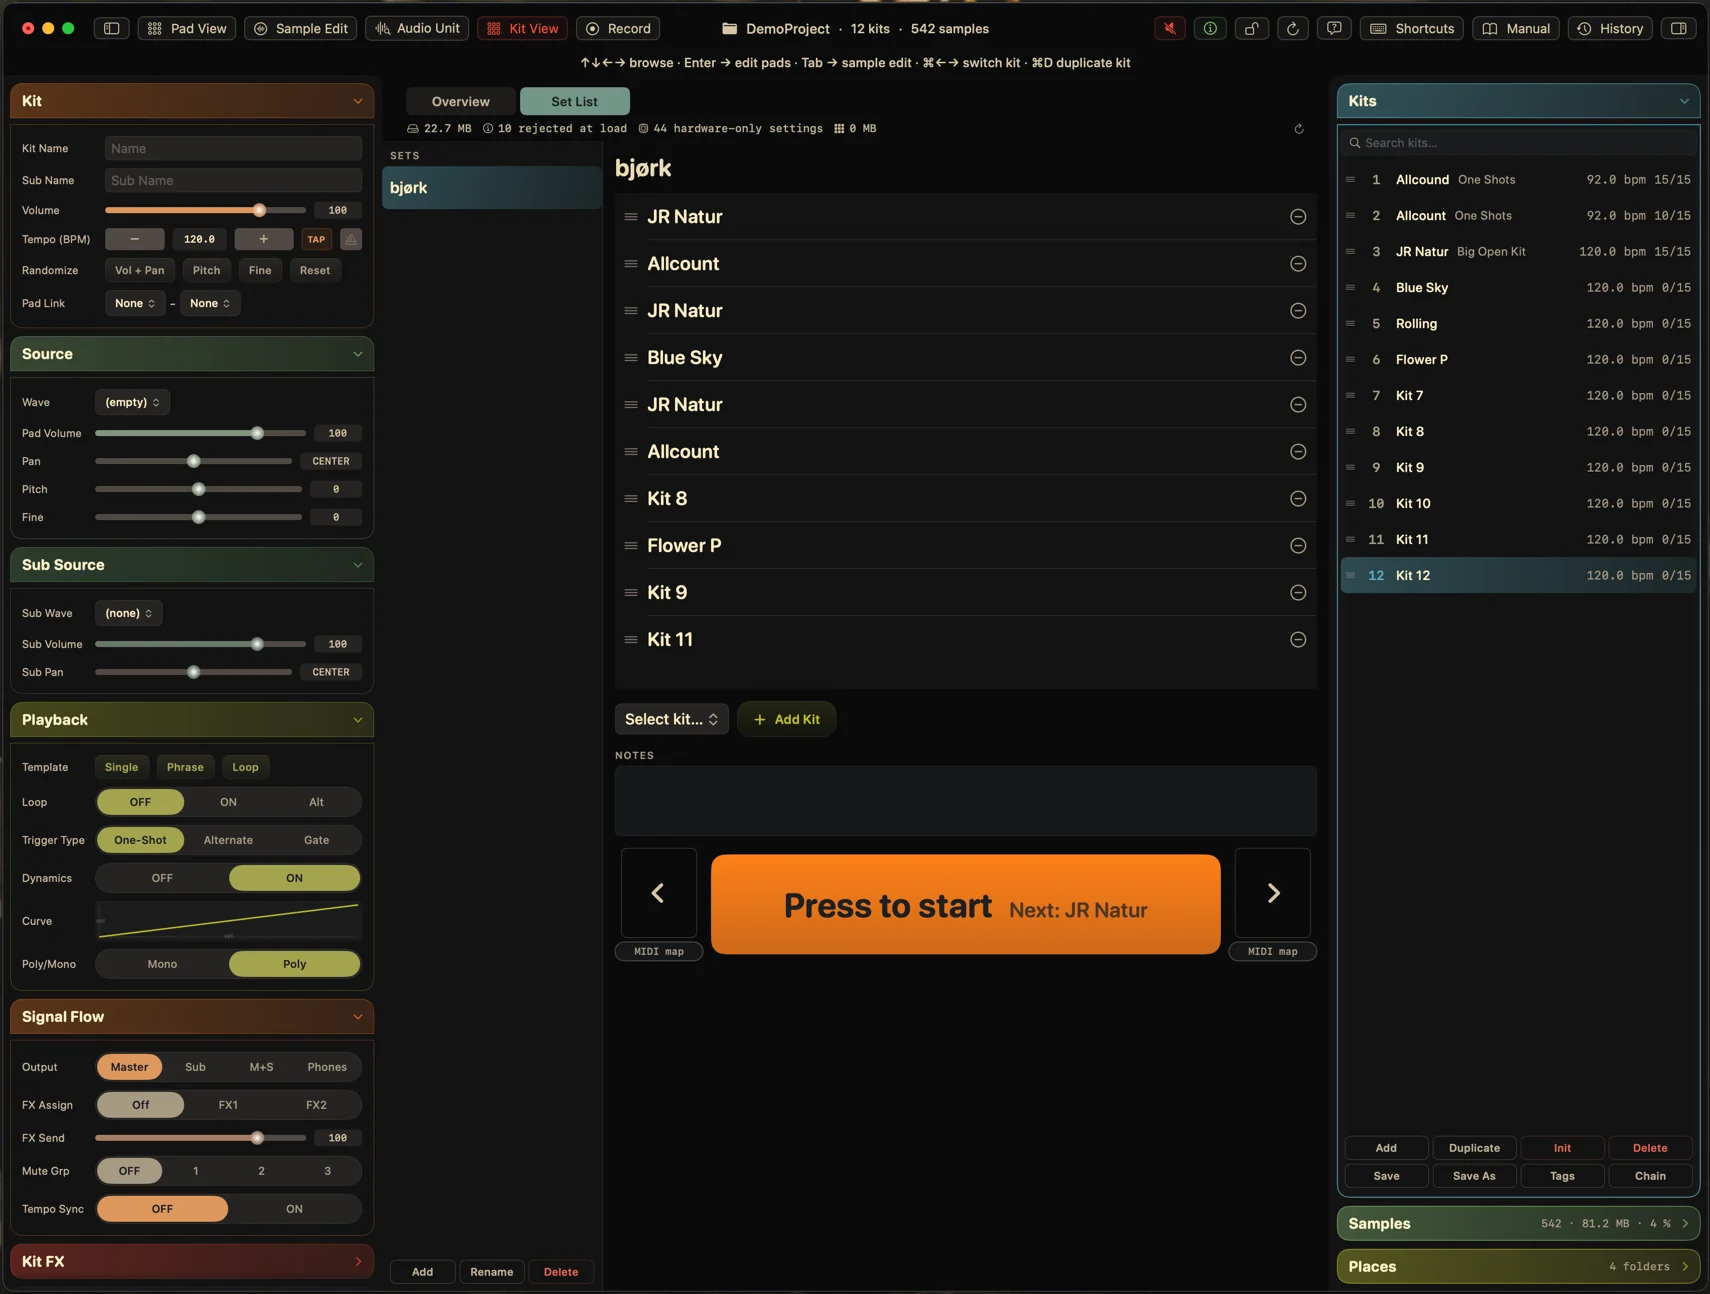
A set is a named list of kits in the order you will play them. Build it by picking kits from your project, drag the rows to reorder, and put the same kit in twice if the set comes back to it, which sets usually do. Each set carries its own notes field, so the reminder that belongs to a particular night lives with that night’s list rather than on a piece of paper.
The bottom of the screen is the part that is not an editor. One large control fills the width, shows the kit you are on, and shows the name of the kit that is next; pressing it advances the set and selects that kit. Before you start it reads “Press to start” and names the first kit, so the state is never ambiguous. Arrows on either side move back and forward.
Under each arrow is a MIDI map button. Map a note to previous and a note to next, and the set steps from the hardware: the SPD-SX sends the note, the Mac moves the set on, and your hands stay on the pads. That is the difference between a feature you look at in rehearsal and one you can use on a stage.
Nothing about a set changes the kits themselves. A set is an order over the kits already on the card, so building one, rearranging it and deleting it costs nothing, and you can keep several sets side by side for different rooms.
Process pads with your own Audio Units
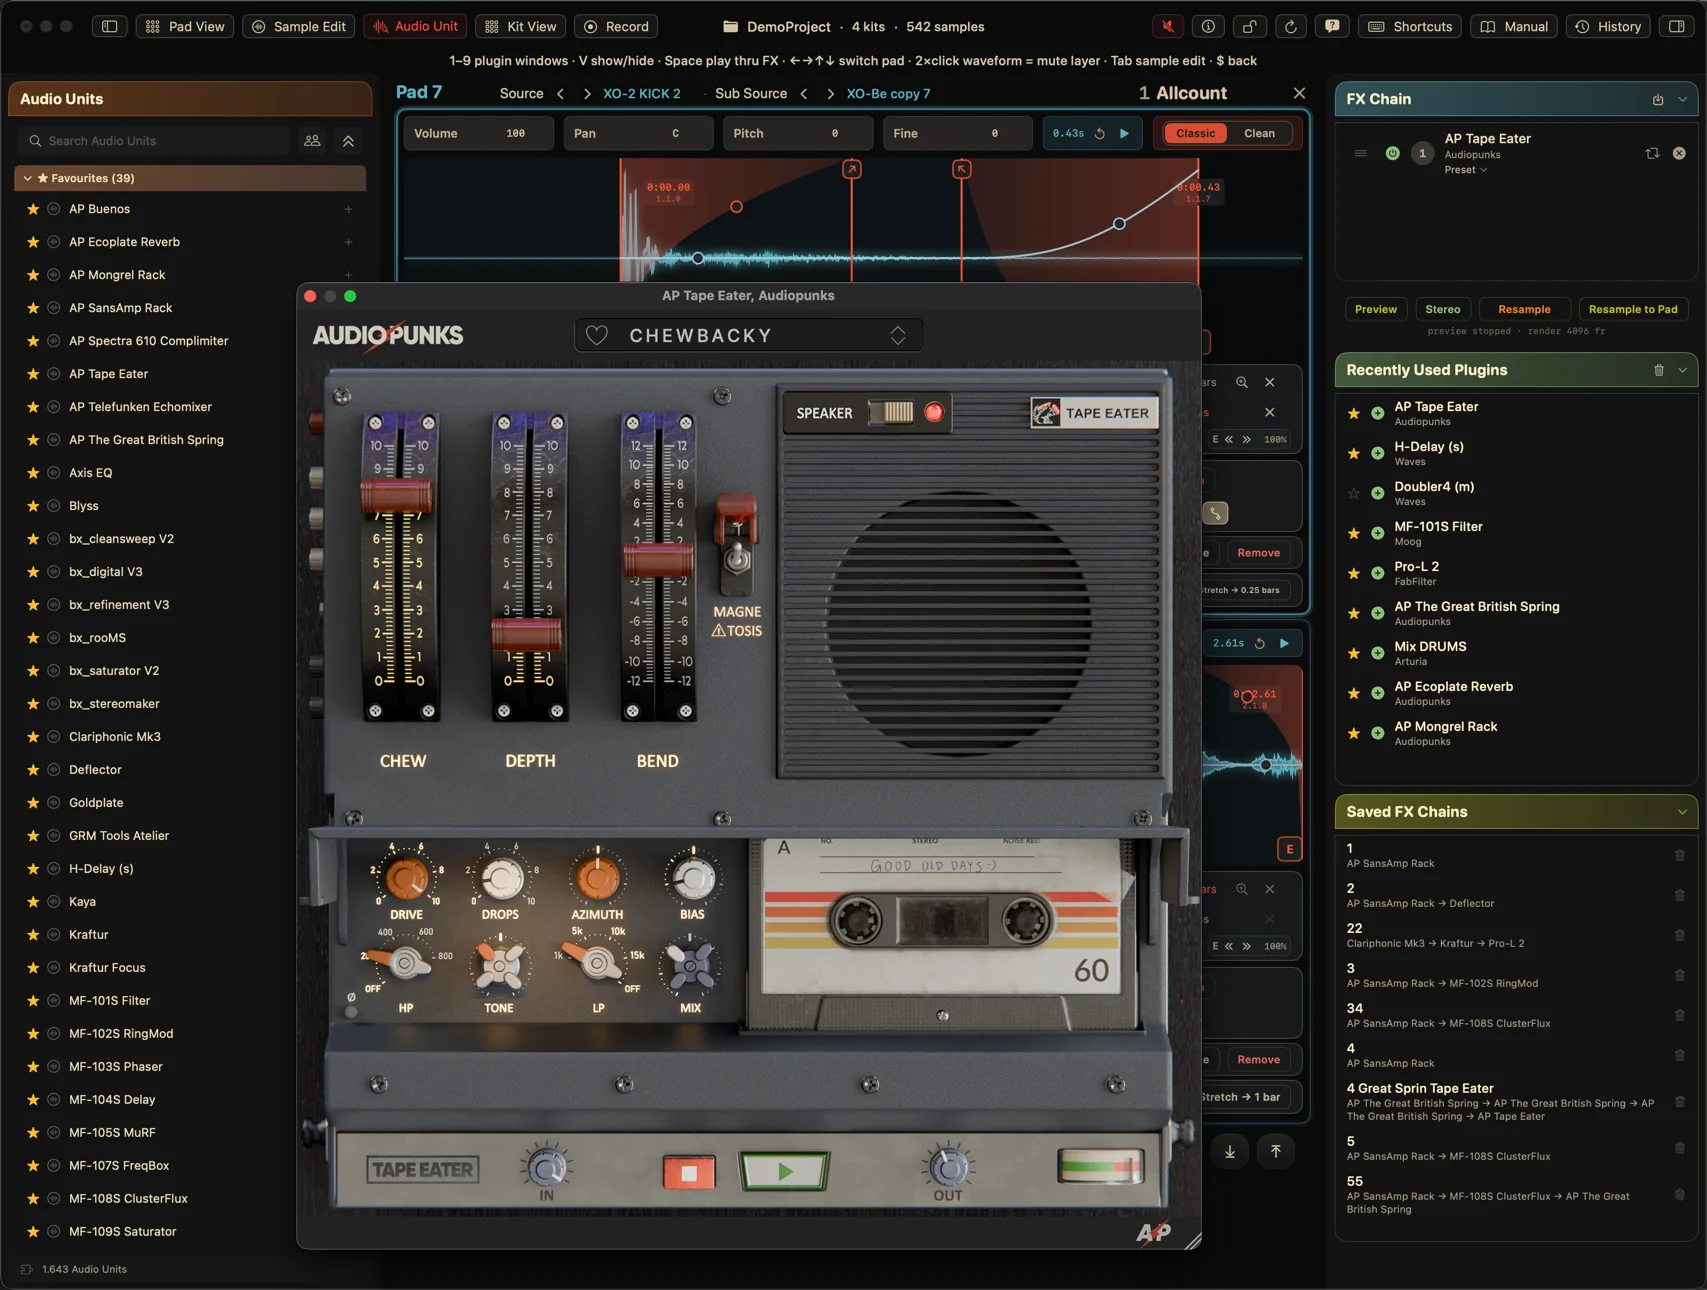
Load Audio Units installed on your Mac onto a pad sample, open their own interfaces over the waveform, and hear the chain on the pad before you commit to it. This is the one capability the App Store edition cannot offer, and the reason the Pro edition is distributed directly.
The browser lists what is installed, the chain holds what you have loaded in order, and a chain you like can be saved and put on another pad. The plug-ins are the ones you already own and already know; what the app adds is a place to use them on a pad sample, where before there was an export, a session in another program, and an import back.
A render lands as a take, never on the pad
Rendering the chain does not overwrite anything. The result is written as a take and collected in a Takes row under the sample you rendered it from, and the pad keeps playing what it played before. Committing a take is a separate, deliberate press.
Each take in the row states what made it: the plug-ins it went through, in order, whether it came out mono or stereo, and how long ago it was rendered. Two takes of the same sample are therefore told apart by their chains rather than by a file name you would have had to invent.
Next to the row is an Original button that plays the pad as it currently sounds, both layers, unprocessed. That is the comparison that matters: the take against the thing it would replace, at the same moment, on the same pad. When one of them wins, the take goes onto the pad’s source or its sub source, and you choose which.
Everything about this is reversible until it is not, and the app is careful about the difference. A take you do not commit costs you nothing, a take you do commit leaves the original file untouched on the card, and the takes you keep stay listed under the pad for the next time you are not sure.
Two editions
| App Store$29 | Pro$39 | |
|---|---|---|
| Kit, pad, project, set list and sample editing | Included | Included |
| Sample library, tagging and A/B comparison | Included | Included |
| Recording, tempo detection and built-in saturation | Included | Included |
| Audio Unit processing | Not available | Included |
| Delivery | Mac App Store | Direct download from allcounter.dev |
Purchasing opens soon
Direct purchasing is not open yet. The Pro edition and its price are final; only the checkout is still being set up.
Apps sold through the Mac App Store run sandboxed and cannot load third-party Audio Unit plug-ins from your system. The Pro edition is distributed directly from allcounter.dev, so it can. That single technical fact is the whole of the difference: everything else in the table above is the same app, built from the same source, on both sides of the column.
Support
Questions, bug reports and feature requests are handled on the support page. The privacy policy covers what the app does and does not collect.